
August 6, 2024


.svg)

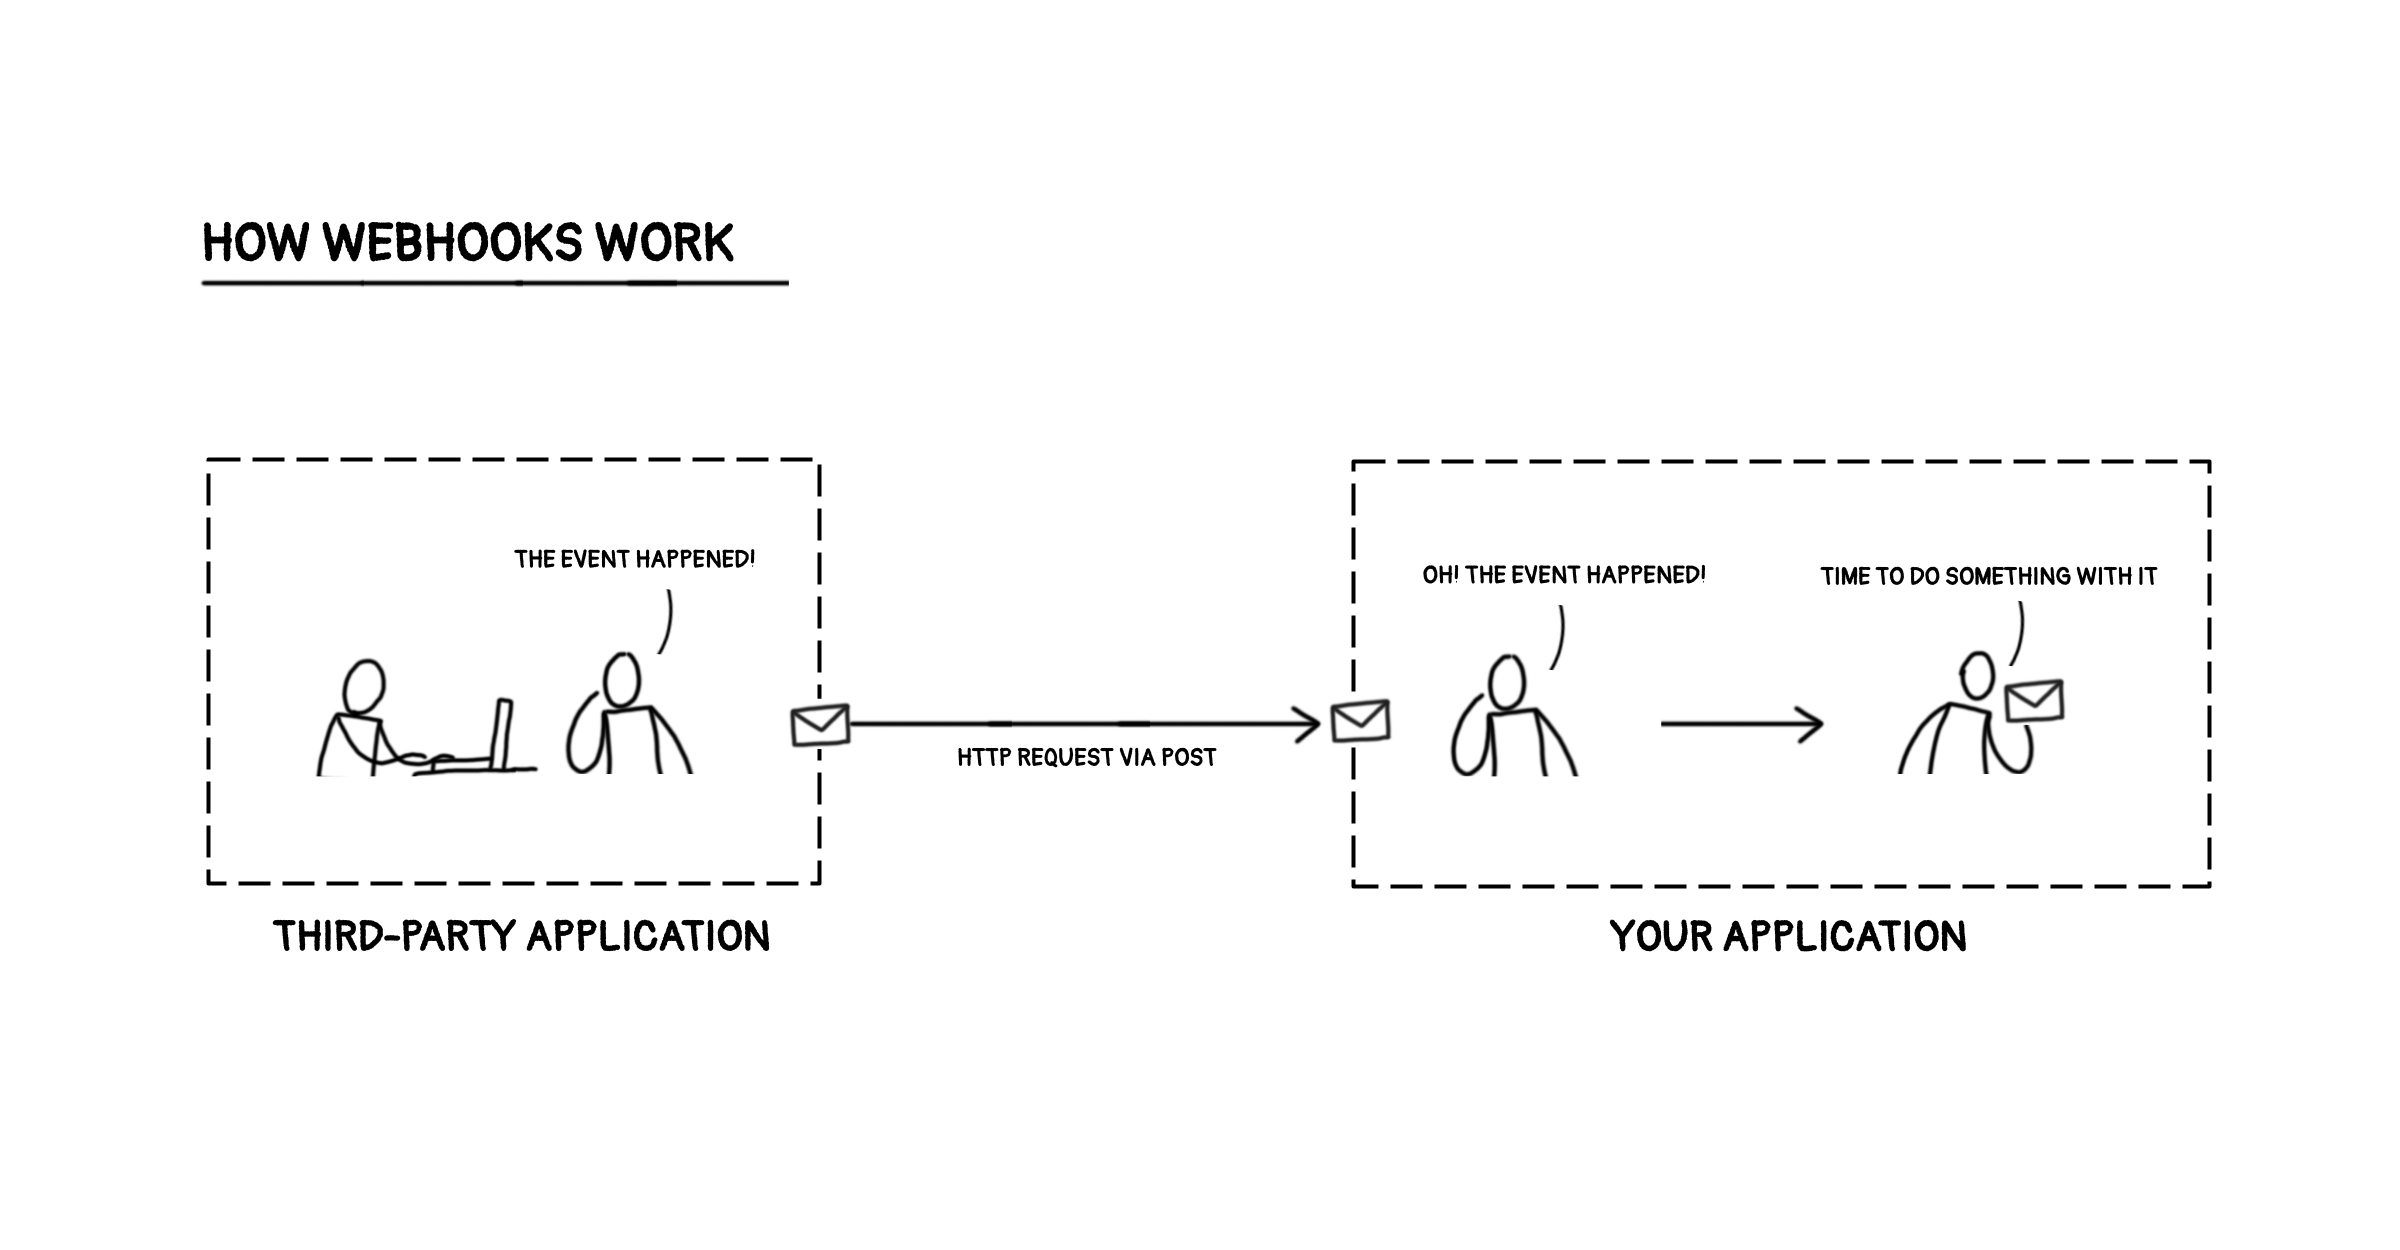
従来、アプリケーションは外部システムから更新を取得するためにポーリングメカニズムに依存していました。このアプローチは非効率的で、リソースを消費し、重要な情報の受信が遅れることもよくありました。Webhooksは、特定のイベントが発生したときに外部システムが事前にデータをアプリケーションに送信するプッシュベースのモデルを導入することで、これに革命をもたらしました。
Webhook は基本的に、ソフトウェアアプリケーションの特定のイベントによってトリガーされる HTTP コールバックです。定義されたイベントが発生すると、ソースシステムは HTTP POST ペイロードをあらかじめ定義された URL に送信し、その発生をアプリケーションに通知します。
Webhook には、従来のポーリング方法に比べていくつかの利点があります。
ウェブフックの基礎を理解したところで、Node.js で基本的な Webhook サービスを構築する準備が整いました。
始めるには、Node.js プロジェクトが必要です。使用 npm init-y 新しいプロジェクトディレクトリをすばやく作成できます。次に、必要な依存関係をインストールします。
npm install express body-parser cors
次のステップには、イベントが発生したときにトリガーする必要のある Webhook を保存する CRUD オペレーションの作成が含まれます。
1。Mongoose を使用して MongoDB インスタンスをセットアップ:という名前のファイルを作成します。 db.js MongoDB データベースに接続するには:
 const mongoose = require('mongoose');

 const connectDB = async () => {
   try {
     await mongoose.connect('mongodb://localhost:27017/webhook_service', {
       useNewUrlParser: true,
       useUnifiedTopology: true,
     });
     console.log('MongoDB connected successfully');
   } catch (error) {
     console.error('MongoDB connection error:', error);
     process.exit(1); // Exit process on connection failure
   }
 };

 module.exports = connectDB;
2。ウェブフックスキーマの定義:
という名前のファイルを作成 Webhook.js ウェブフックデータの Mongoose モデルを定義するには:
 const mongoose = require('mongoose');

 const WebhookSchema = new mongoose.Schema({
   url: {
     type: String,
     required: true,
   },
   headers: {
     type: Object,
     default: {},
   },
   events: {
     type: [String], // Array of strings representing subscribed events
     required: true,
   },
   createdAt: {
     type: Date,
     default: Date.now,
   },
  // Additional considerations:

   secret: {
     type: String,
     default: '', // Optional secret key for authentication
   },
   isActive: {
     type: Boolean,
     default: true, // Flag indicating if the webhook is currently active
   },
   description: {
     type: String,
     default: '', // Optional description of the webhook's purpose
   },

 });

 module.exports = mongoose.model('Webhook', WebhookSchema);
3。すべての Webhook を一覧表示するエンドポイントを定義します。
 // Read (GET) all webhooks
 app.get('/webhooks', async (req, res) => {
   try {
     const webhooks = await Webhook.find();
     res.json(webhooks);
   } catch (error) {
     console.error(error);
     res.status(500).send('Server Error');
   }
 });
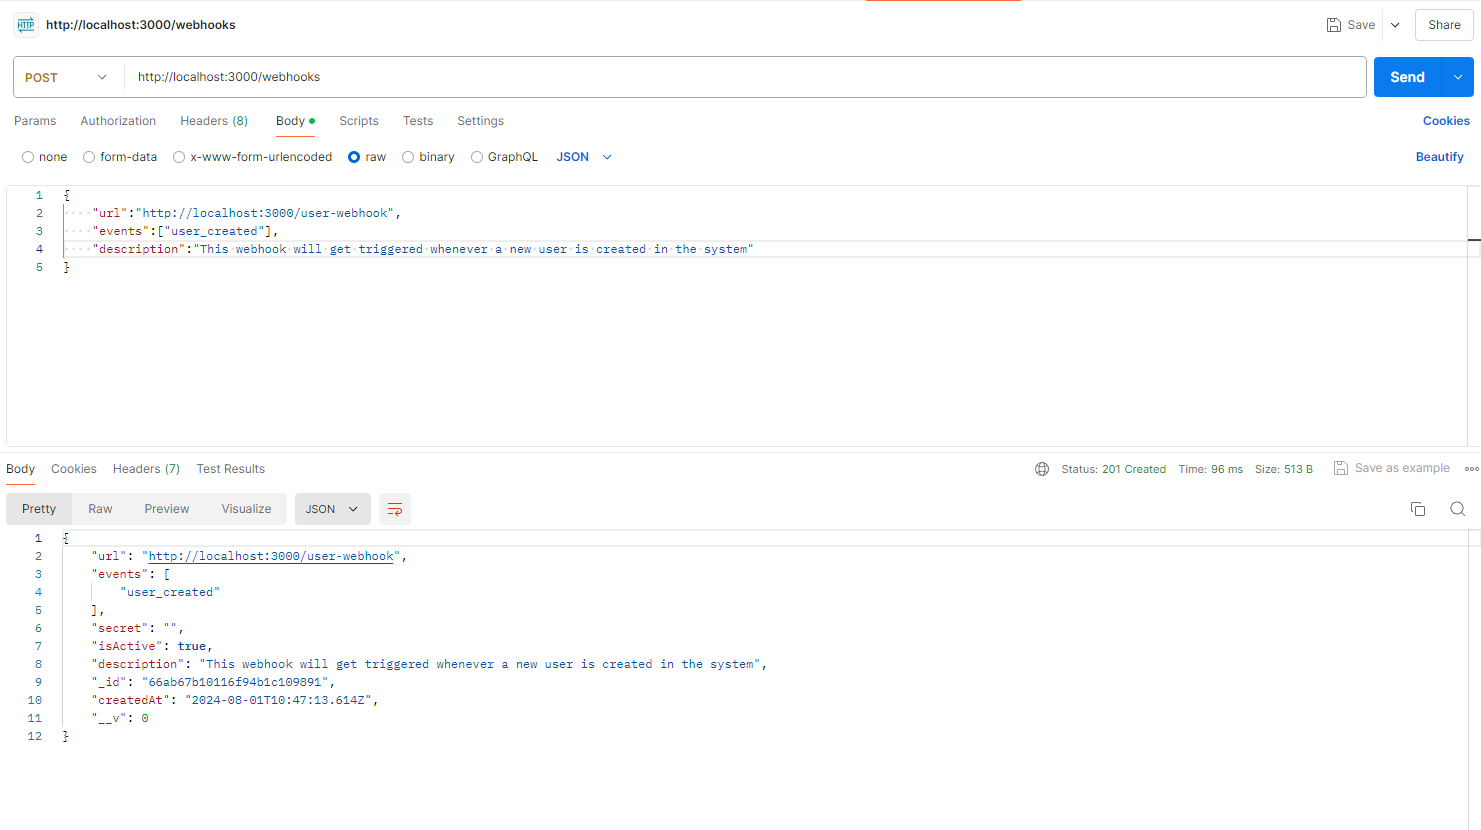
4。Webhook をデータベースに保存するエンドポイントを定義します。
 // Create (POST) a new webhook
 app.post('/webhooks', async (req, res) => {
   try {
     const newWebhook = new Webhook(req.body);
     const savedWebhook = await newWebhook.save();
     res.status(201).json(savedWebhook);
   } catch (error) {
     console.error(error);
     res.status(500).send('Server Error');
   }
 });
5。ID を使用して 1 つの Webhook を取得するエンドポイントを定義します。
 // Read (GET) a single webhook by ID
 app.get('/webhooks/:id', async (req, res) => {
   try {
     const webhook = await Webhook.findById(req.params.id);
     if (!webhook) {
       return res.status(404).send('Webhook not found');
     }
     res.json(webhook);
   } catch (error) {
     console.error(error);
     res.status(500).send('Server Error');
   }
 });
6。id を使用して Webhook を更新するエンドポイントを定義します。
 // Update (PUT) a webhook by ID
 app.put('/webhooks/:id', async (req, res) => {
   try {
     const updatedWebhook = await Webhook.findByIdAndUpdate(
       req.params.id,
       req.body,
       { new: true } // Return the updated document
     );
     if (!updatedWebhook) {
       return res.status(404).send('Webhook not found');
     }
     res.json(updatedWebhook);
   } catch (error) {
     console.error(error);
     res.status(500).send('Server Error');
   }
 });
7。id を使用して Webhook を削除するエンドポイントを定義します。
 // Delete (DELETE) a webhook by ID
 app.delete('/webhooks/:id', async (req, res) => {
   try {
     const deletedWebhook = await Webhook.findByIdAndDelete(req.params.id);
     if (!deletedWebhook) {
       return res.status(404).send('Webhook not found');
     }
     res.json({ message: 'Webhook deleted successfully' });
   } catch (error) {
     console.error(error);
     res.status(500).send('Server Error');
   }
 });
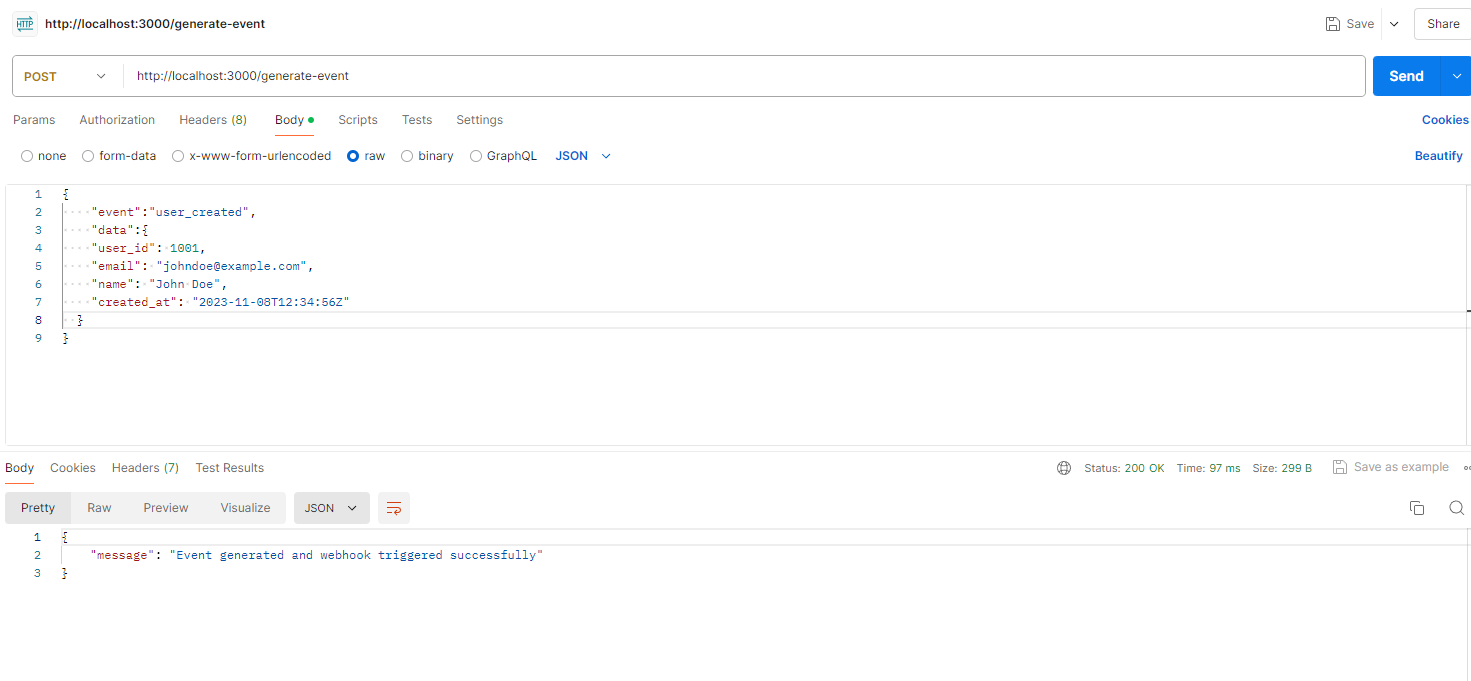
このセクションでは、ダミーイベントを生成し、続いてこのイベントに登録されているWebhookをトリガーするエンドポイントを作成します。
このロジックに含まれるステップは以下のとおりです。
ポスト それぞれのペイロードを含む各ウェブフックへのリクエストapp.post('/generate-event', async (req, res) => {
try {
const {event, data} = req.body;
// fetch all webhooks that subscribed to this event
const webhooks = await Webhook.find({
events:event
});
// Define webhook payload
const webhookPayload = {
event: event,
data: data,
};
// Send POST request to each webhook endpoint
for (const webhook of webhooks) {
await axios.post(webhook?.url, webhookPayload);
}
res.status(200).json({ message: 'Event generated and webhook triggered successfully' });
} catch (error) {
console.error('Error generating event and triggering webhook:', error);
res.status(500).json({ error: 'Internal server error' });
}
});
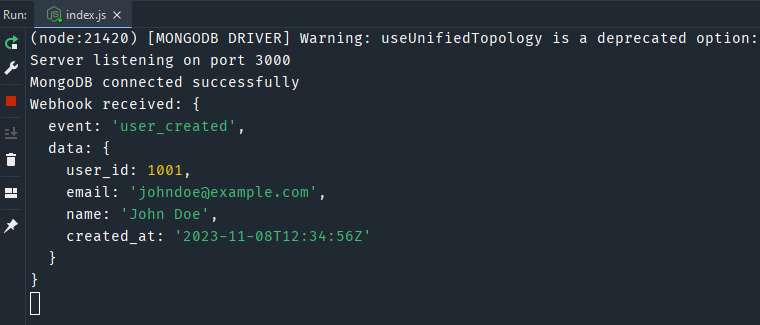
Webhookレシーバーは基本的にリスニングサービスです。 他のアプリケーションがあなたにメッセージを送信できるメールボックスのようなものです。この例では、エンドポイントを定義しています。 /ユーザ・ウェブフック データを受信して処理し、画面に記録します。
index.js ファイル、新しいルートの作成 /ユーザ・ウェブフック 受信する Webhook リクエストを処理します。必須ボディ Webhook ペイロードで送信されたデータにアクセスします。app.post('/webhook', (req, res) => {
console.log('Webhook received:', req.body);
res.status(200).send('Webhook received');
});
Webhook サービスをテストするには、テストを以下のように 3 つのユースケースに分割する必要があります。
これは基本的な例です。本番環境では、Webhook のエラー処理、検証、非同期処理をより堅牢に実装する必要があるでしょう。
Webhook を扱う際には、セキュリティが最も重要です。重要な対策は次のとおりです。
Webhook データを処理する前に、データの正確性とセキュリティを検証することが不可欠です。
検証したら、その内容に基づいてWebhookデータを処理します。これには、データの保存、他のアクションの起動、またはアプリケーションの状態の更新が含まれる場合があります。
結論として、Node.js で安全で効率的な Webhook サービスを構築するには、Webhook の基礎を理解し、Node.js プロジェクトをセットアップし、CRUD 操作を実装し、強固な Webhook のトリガーおよび受信メカニズムを作成する必要があります。エンドポイントの保護、受信データの検証、信頼性の高い配信の確保などのベストプラクティスに従うことで、回復力がありスケーラブルなウェブフックサービスを構築できます。このガイドは、リアルタイムの更新とリソースの効率的な利用を実現し、最終的にアプリケーションのパフォーマンスとセキュリティを強化するのに役立つ包括的なロードマップを提供します。

.svg)

私たちを信頼している6000人以上の業界幹部の仲間入りをしましょう。
私たちを信頼している6000人以上の業界幹部の仲間入りをしましょう。

何千人もの経営幹部から信頼されているニュースレターを購読してください。


.svg)
.svg)
.svg)
.svg)